A plain-language walkthrough of how to make your flows smarter using Condition and Switch actions — with real examples you can copy.
If you have built even one flow in Power Automate, you already know that most real work is not a straight line. Sometimes you want the flow to do one thing when a value is true, and something else when it is not. Sometimes you have five or six possible outcomes and checking each one with a separate condition feels clunky. This is exactly the job of two actions: Condition and Switch.
In this guide, I will walk you through both actions in plain English. No jargon, no fluff. Just what they do, when to use each one, and real examples you can copy into your own flow today.
What Is a Condition in Power Automate?
A Condition action lets your flow check if something is true or false, and then run different actions based on the answer. Think of it as a fork in the road. Your flow reaches the fork, checks a value, and then goes left or right depending on what it finds.
Every Condition action has three parts:
- Yes branch — the actions that run when the condition is true.
- No branch — the actions that run when the condition is false.
- The condition itself — the rule your flow checks, such as “Amount is greater than 1000.”
You can compare numbers, text, dates, or even the result of another action. Power Automate also lets you stack multiple conditions together using “And” or “Or,” so you are not stuck with just one rule.
How to Add a Condition Action
- Open your flow in edit mode and click the plus (+) icon where you want the check to happen.
- Search for “Condition” in the action list and select the Condition control.
- In the first box, choose the value you want to check (for example, a number from a form).
- Pick an operator, such as “is greater than,” “is equal to,” or “contains.”
- Type or select the value to compare against.
- Add your actions inside the “If yes” box and the “If no” box.
- Save and test the flow with a value that should pass, and one that should fail.
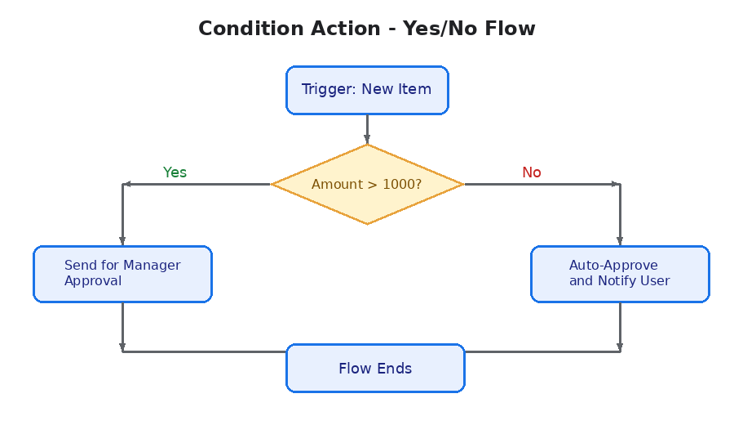
A simple Condition flow: check the amount, then branch into two paths.
Example: Approve or Reject Based on Amount
Let’s say you run an expense approval flow. Any expense above $1,000 needs a manager’s sign-off. Anything below that can be approved automatically. Here is how the fields would look inside the Condition action:
| Field | Setting |
| Value | Amount (from the form response) |
| Operator | is greater than |
| Compare to | 1000 |
| If yes | Start an approval and assign it to the manager |
| If no | Auto-approve the item and send a confirmation email |
That’s it. One check, two clear outcomes. This is the kind of logic that used to take a developer a few lines of code, and now takes two clicks and a text box.
What Is a Switch Action in Power Automate?
A Switch action is what you reach for when a Condition action starts to feel too small. Instead of just Yes or No, Switch lets you check one value and route it down several possible paths — as many as you need.
Picture a support ticket system where tickets come in marked High, Medium, or Low. Building this with Condition actions means nesting one condition inside another, which gets messy fast. Switch handles this in one clean action.
A Switch action has these parts:
- On — the value your flow will check, such as a priority field.
- Case — one branch for each possible value (High, Medium, Low, and so on).
- Default — the branch that runs when the value does not match any of your cases.
How to Add a Switch Action
- Click the plus (+) icon in your flow and search for “Switch.”
- Select the Switch control and add it to your flow.
- In the “On” field, choose the value you want to check, such as a Priority column.
- Click “Add a case” for each outcome you want to handle, and type the exact value for that case.
- Add the actions that should run under each case.
- Fill in the Default case so the flow still does something sensible if the value does not match.
- Save and test with a few different values to make sure each case fires correctly.
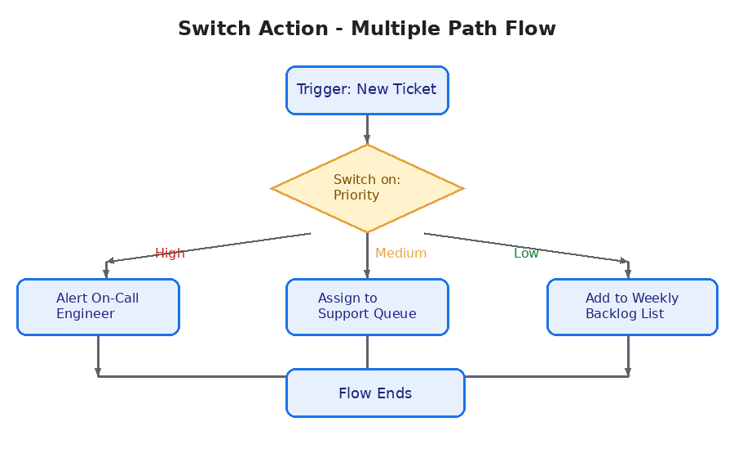
A Switch action checking ticket priority and routing to three different paths.
Example: Route Support Tickets by Priority
Here is a simple support desk flow that uses Switch to decide what happens to a new ticket, based on its priority field:
| Case | Action Taken |
| High | Send a Teams alert to the on-call engineer right away |
| Medium | Assign the ticket to the general support queue |
| Low | Add the ticket to a weekly backlog list |
| Default | Flag the ticket for manual review (unknown priority) |
Notice the Default case. It is easy to skip this step, but it matters. If someone enters “Urgent” instead of “High,” you still want the flow to catch it instead of silently doing nothing.
Condition vs Switch: Which One Should You Use?
Both actions do a similar job — they let your flow make a decision. The difference is how many outcomes you are dealing with, and how the checks are structured. Here is a quick comparison:
| Point | Condition | Switch |
| Best for | Two outcomes (true or false) | Three or more outcomes |
| Structure | If / else, one rule at a time | One value, many possible cases |
| Nesting needed? | Yes, if you have many outcomes | No, all cases sit side by side |
| Readability | Can get messy with nested conditions | Stays clean even with many cases |
| Typical use | Approve or reject, pass or fail checks | Status routing, category-based actions |
A simple way to decide: if you are asking a yes-or-no question, use Condition. If you are asking “which one of these several options is it,” use Switch.
Common Mistakes to Avoid
- Forgetting the Default case in Switch — always add one, even if it just sends a notification.
- Nesting too many Condition actions instead of switching to a Switch action once you pass two or three outcomes.
- Comparing text and numbers incorrectly — a number stored as text will not match a plain number in your condition.
- Leaving the “If no” branch empty — it is fine to leave it blank on purpose, but do it knowingly, not by accident.
- Not testing both branches — many flow bugs only show up on the path you forgot to test.
Tips to Write Better Conditions
- Keep field names clear so your Yes and No branches are easy to read later.
- Use “And” / “Or” groups when you need more than one rule, instead of stacking separate Condition actions.
- Add a short note or rename your Condition and Switch actions so your flow reads like a sentence.
- Test with edge case values, such as exactly 1000 in the expense example, not just numbers far above or below it.
- Review your flow after a few weeks of real use — the cases you expect are not always the cases that show up.
Frequently Asked Questions
Can I use a Switch action instead of several Condition actions?
Yes. If you find yourself nesting Condition actions three or four levels deep, that is usually a sign a Switch action would work better. It checks one value and lets you branch into as many cases as you need, without the nesting.
What happens if none of the Switch cases match?
The flow runs whatever you placed inside the Default case. If you leave Default empty, the flow simply does nothing for that path, which can hide errors. It is best practice to always add something to Default, even a simple notification.
Can a Condition action check more than one rule at once?
Yes. Inside the Condition action, you can add multiple rows and choose “And” (all rules must be true) or “Or” (at least one rule must be true). This lets you build fairly detailed logic without needing extra actions.
Does the order of cases in a Switch action matter?
No. Power Automate checks the incoming value against each case and runs the one that matches. Only one case runs per execution, so the order you list them in does not change the result.
Can I nest a Switch action inside a Condition action?
Yes, and it is a common pattern. For example, you might first check if a ticket is still open using a Condition action, and only then use a Switch action to route it by priority. Combining both keeps your flow logical and easy to follow.
Why does my Condition action say true when I expect false?
This usually happens because of a data type mismatch — for example, comparing a number field to a text value, or comparing dates in different formats. Double-check the data type of both sides of your comparison, and use functions like int() or float() if you need to convert text to a number first.
Final Thoughts
Condition and Switch actions are two of the most useful tools in Power Automate, and once you get comfortable with them, you will find yourself using them in almost every flow you build. Start simple: use Condition for straightforward yes-or-no checks, and reach for Switch as soon as you have three or more possible outcomes to handle.
The best way to learn is to build something small, break it on purpose, and watch how the flow behaves. Try turning one of your existing flows into a Switch-based flow and see how much cleaner it looks.